Modules and assets
Modules hold all logic that can change the state of the blockchain, or in other words all logic that can make changes on the blockchain.
Modules can be registered to a blockchain application to extend the on-chain logic.
|
For a more practical guide how to create a new module, check out the guide Creating a new module. If you wish to view an example of a fully implemented module, check out the following examples:
|
Adding a module to the application
Modules need to be registered to become available in the application.
If the application was bootstrapped with Lisk Commander, they are registered in the file src/app/modules.ts.
|
Registering a new module requires the generation of a new genesis block if the module defines an Account schema. This always results in a hardfork of the blockchain of the application. Check out the Generating a genesis block guide for more information on how to generate a new genesis block for your application. |
modules.tsimport { Application } from 'lisk-sdk';
import { SomeModule } from "some-module"; (1)
export const registerModules = (app: Application): void => {
app.registerModule(SomeModule); (2)
};| 1 | Import the module from an NPM (Node Package Manager), package or from a local path. |
| 2 | Add this line to register the module to the application. |
Module anatomy
All important parts of a module are explained in more detail and are shown in the diagram below.
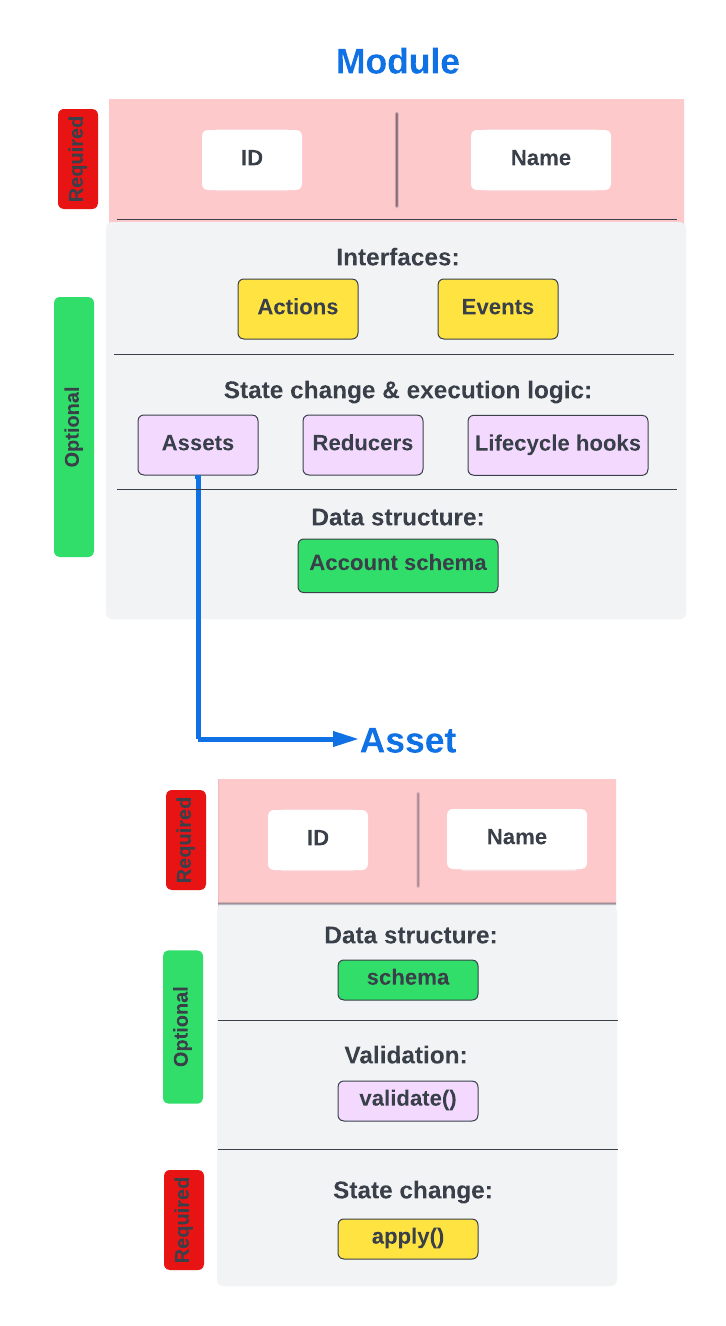
The module class
Each module is constructed as a class which extends from the BaseModule.
The base module provides an interface which needs to be completed by implementing the described components of a module as listed below.
const { BaseModule } = require('lisk-sdk');

class HelloModule extends BaseModule {

}
Module ID
The module ID is the unique identifier for a module in the application.
The module IDs 0-999 are reserved for official modules for the Lisk SDK.
This means that the minimum ID for a new module is 1000.
The maximum value for a module ID is 2^32 - 1 (this equals 4,294,967,295), because it is stored as a uint32 value.
It is also important to note, that module IDs do not need to be in succession, the only requirement is that they are unique within the blockchain application.
So as an example, it is valid to register multiple modules to the application which have the following module IDs: 1003, 1000, and 2500001 as they are in the allowed number range, and each ID is different.
id = 1000;Module name
The module name is the human readable unique identifier for the module.
It is used as a prefix in the alias of events and actions, and as a key label to add the properties of the Account schema to the user accounts [1].
name = 'hello';Logger
The logger is accessible inside of a module under this._logger.
As the name suggests, the logger creates log messages for the module for the different log levels:
-
trace
-
debug
-
info
-
warn
-
error
-
fatal
this._logger.debug(nextRound, 'Updating delegate list for');The logger expects 2 arguments:
-
Data of the log message (object).
-
Message of the log message (string).
Genesis config
The genesis configuration is accessible in a module under the variable this.config.
console.log(this.config.blockTime);
// 10
Interfaces
Modules can expose interfaces (Actions, and Events), which allow other components of the application to interact with the module.
| View the "Interfaces" section of the Communication page to see an overview about the different interfaces and their accessibility in modules, plugins, and external services. |
dataAccess
Use the property this._dataAccess to access data from the blockchain in the module.
| Updating and changing of data on the blockchain is only allowed inside of Assets and Lifecycle Hooks via The state store. |
const res = await this._dataAccess.getChainState('hello:helloCounter');|
The data is encoded in the database, therefore it needs to be decoded after receiving it with For more information about this topic, check out the Codec & schema page. |
The following functions are available via this._dataAccess:
export interface BaseModuleDataAccess {
	getChainState(key: string): Promise<Buffer | undefined>;
	getAccountByAddress<T>(address: Buffer): Promise<Account<T>>;
	getLastBlockHeader(): Promise<BlockHeader>;
}
Actions
Actions are functions which can be invoked via Remote-Procedure-Calls (RPC) by plugins and external services, to request data from the module.
actions = {
    amountOfHellos: async () => {
        const res = await this._dataAccess.getChainState(CHAIN_STATE_HELLO_COUNTER);
        const count = codec.decode(
            helloCounterSchema,
            res
        );
        return count;
    },
};State changes & execution logic
The parts which contain the logic to perform state mutation on the blockchain are possibly the most important part of the module, as they define the underlying business logic and general behavior of a module.
It is possible to change the state of the blockchain in the Reducers, Lifecycle Hooks or Assets of a module.
| All of the logic implemented in a module / asset must be “deterministic” and executable within the block time. |
The state store
The stateStore is used to mutate the state of the blockchain data, or to retrieve data from the blockchain.
Inside of a module, the stateStore is available for Reducers, Assets and all Lifecycle Hooks.
stateStoreinterface StateStore {
readonly account: {
get<T = AccountDefaultProps>(address: Buffer): Promise<Account<T>>;
getOrDefault<T = AccountDefaultProps>(address: Buffer): Promise<Account<T>>;
set<T = AccountDefaultProps>(address: Buffer, updatedElement: Account<T>): Promise<void>;
del(address: Buffer): Promise<void>;
};
readonly chain: {
lastBlockHeaders: ReadonlyArray<BlockHeader>;
lastBlockReward: bigint;
networkIdentifier: Buffer;
get(key: string): Promise<Buffer | undefined>;
set(key: string, value: Buffer): Promise<void>;
};
}Assets
Assets are responsible for executing logic that introduces state changes on the blockchain, based on input parameters which are provided by the users as transactions.
A blockchain application can accept many different kinds of transactions, depending on its use case. Every transaction type is handled by a specific asset of a module in the application. The default application already supports the following transactions:
To add support for a new transaction to the application, it is required to implement a new asset and to add the asset to a module.
transactionAssets = [ new HelloAsset() ];| To learn how to create a new asset, check out the Creating a new asset guide. |
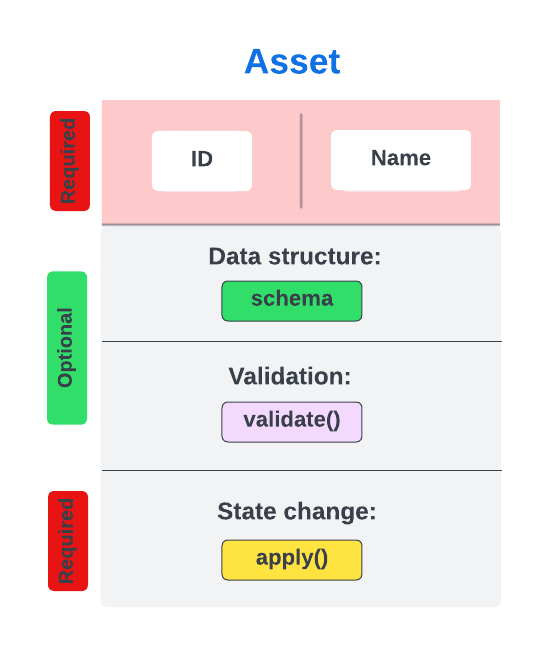
Asset anatomy
Each asset is constructed as a class which extends from the BaseAsset.
The base asset provides an interface which needs to be completed by implementing the described components of an asset which are shown in the diagram below.
Transaction asset schema
The asset schema defines the custom data structure of the transaction.
It defines which properties are required in the transaction asset, and also which data types are to be expected.
If a transaction object does not match the corresponding schema, the transaction will not be accepted by the node.
Asset schemas are defined in a modified JSON schema. For more information about this topic, check out the Codec & schema page.
schema = {
    $id: 'lisk/hello/asset', (1)
    type: 'object',
    required: ["helloString"], (2)
    properties: { (3)
        helloString: {
            dataType: 'string',
            fieldNumber: 1,
        },
    }
};| 1 | The ID under which assets are saved in the database. Must be unique. |
| 2 | All properties of the asset must be defined as required. |
| 3 | Contains the properties of the transaction asset. |
Validate
As the name suggests, the validate() function validates the posted transaction data to check that it contains the expected format.
The following variables are available inside the validate() function:
-
asset: The custom data of the transaction (defined in Transaction asset schema), posted to the node. -
transaction: The complete transaction object which was posted to the node.
If the function throws any errors, the transaction will not be applied by the node.
If the function does not throw any errors, the transaction will passed to the apply() function.
validate({asset}) {
    if (asset.name === "Mewtwo") {
        throw new Error("Illegal NFT name: Mewtwo");
    }
};
Apply
The apply() function of an asset applies the desired business logic on the blockchain, based on the data posted in the transaction.
The following variables are available inside the apply() function:
-
asset: The custom data of the transaction (defined in Transaction asset schema), posted to the node. -
stateStore: See The state store. -
reducerHandler: See reducerHandler. -
transaction: The complete transaction object which was posted to the node.
async apply({ asset, stateStore, reducerHandler, transaction }) {
    // Get sender account details
    const senderAddress = transaction.senderAddress;
    const senderAccount = await stateStore.account.get(senderAddress);
    // Add the hello string to the sender account
    senderAccount.hello.helloMessage = asset.helloString;
    stateStore.account.set(senderAccount.address, senderAccount);
    // Get the hello counter and decode it
    let counterBuffer = await stateStore.chain.get(
        CHAIN_STATE_HELLO_COUNTER
    );
    let counter = codec.decode(
        helloCounterSchema,
        counterBuffer
    );
    // Increment the hello counter by +1
    counter.helloCounter++;
    // Save the updated counter on the chain
    await stateStore.chain.set(
        CHAIN_STATE_HELLO_COUNTER,
        codec.encode(helloCounterSchema, counter)
    );
}
Lifecycle Hooks
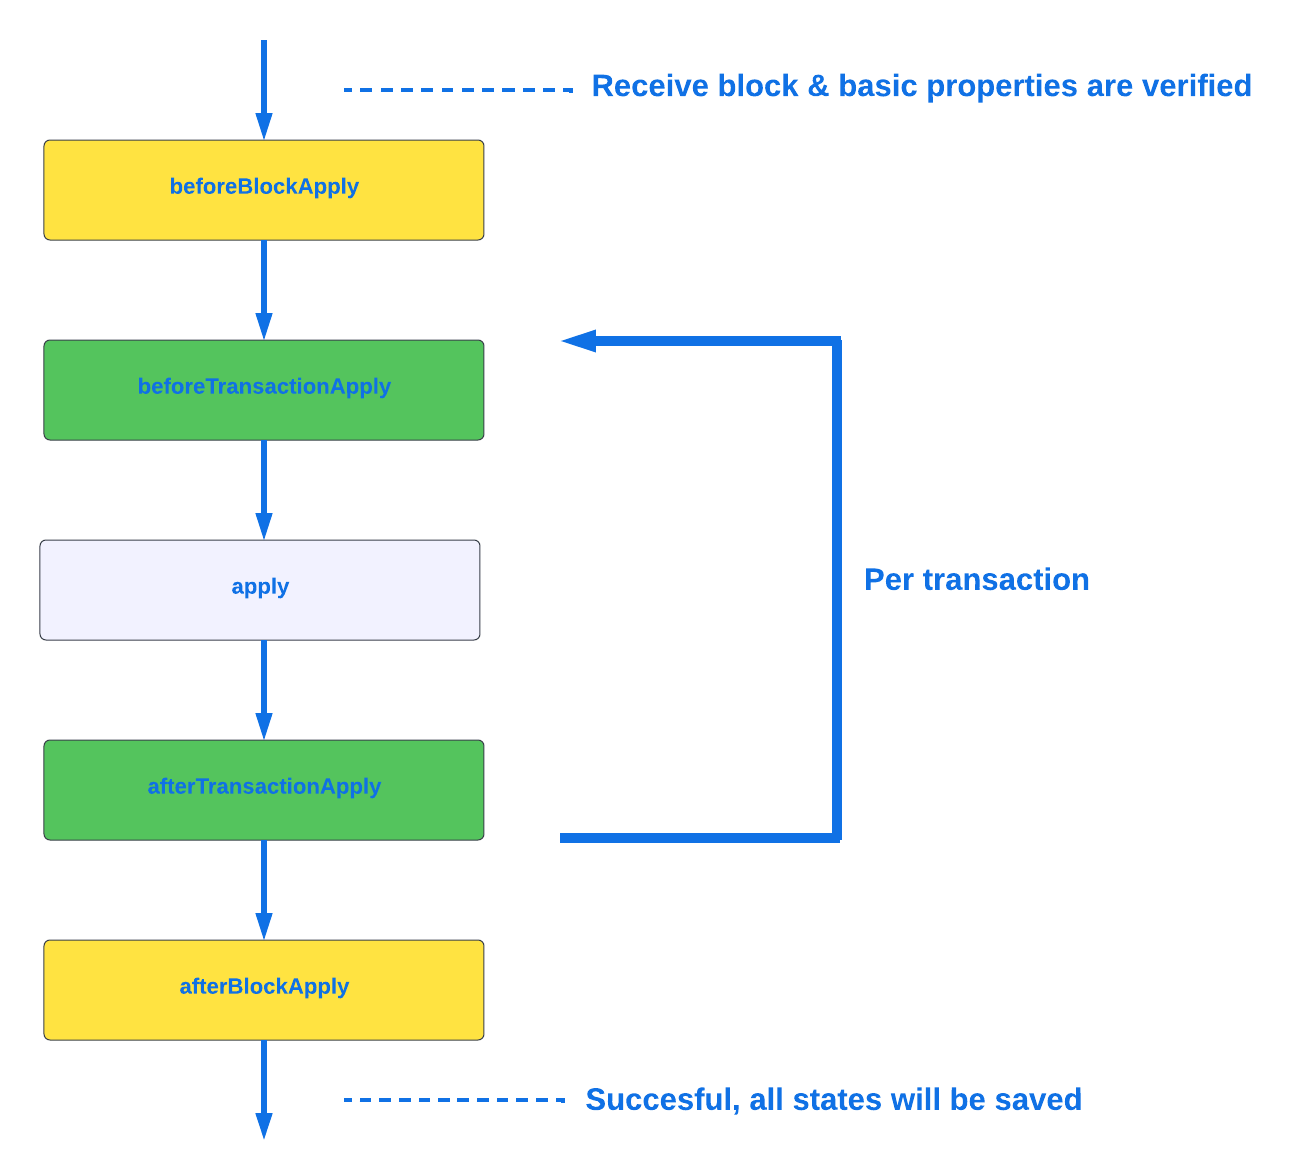
Lifecycle hooks allow the execution of logic at specific moments in the Block life cycle of the application.
async afterTransactionApply({transaction, stateStore, reducerHandler}) {
  // If the transaction is a hello transaction
  if (transaction.moduleID === this.id && transaction.assetID === HelloAssetID) {
    // Decode the transaction asset
    const helloAsset = codec.decode(
      helloAssetSchema,
      transaction.asset
    );

    // And publish a new hello:newHello event,
    // including the latest hello message and the sender.
    this._channel.publish('hello:newHello', {
      sender: transaction._senderAddress.toString('hex'),
      hello: helloAsset.helloString
    });
  }
};
beforeTransactionApply()
This hook is applied before each transaction.
The following variables are available inside this hook:
-
transaction: The complete transaction object which was posted to the node. -
stateStore: See The state store. -
reducerHandler: See reducerHandler. -
this._channel: See Channel for modules.
afterTransactionApply()
This hook is applied after each transaction.
The following variables are available inside this hook:
-
transaction: The complete transaction object which was posted to the node. -
stateStore: See The state store. -
reducerHandler: See reducerHandler. -
this._channel: See Channel for modules.
afterGenesisBlockApply()
This hook is applied after the genesis block.
The following variables are available inside this hook:
-
genesisBlock: The genesis block of the application. -
stateStore: See The state store. -
reducerHandler: See reducerHandler. -
this._channel: See Channel for modules.
beforeBlockApply()
This hook is applied before each block.
The following variables are available inside this hook:
-
block: The block before it is applied on the blockchain. -
stateStore: See The state store. -
reducerHandler: See reducerHandler. -
this._channel: See Channel for modules.
afterBlockApply()
This hook is applied after each block.
The following variables are available inside this hook:
-
block: The block after it is applied on the blockchain. -
stateStore: See The state store. -
reducerHandler: See reducerHandler. -
this._channel: See Channel for modules. -
consensus: See Consensus.
Consensus
consensus offers different consensus related functions to get and set the list of active delegates, and to get the finalized height of the blockchain.
{
	getDelegates: () => Promise<Delegate[]>; (1)
	updateDelegates: (delegates: Delegate[]) => Promise<void>; (2)
	getFinalizedHeight: () => number; (3)
}| 1 | Get a list of the actively forging delegates in the current round. |
| 2 | Update the list of delegates for the current round. |
| 3 | Returns the currently finalized height of the blockchain. |
Account schema
The account schema allows a module to store module-specific data in the user accounts [1].
The definition of this schema is totally flexible and it is possible to define very complex data structures as well if necessary.
Account schemas are defined in a modified JSON schema. For more information about this topic, check out the Codec & schema page.
accountSchema = {
    type: 'object',
    properties: {
        helloMessage: {
            fieldNumber: 1,
            dataType: 'string',
        },
    },
    default: {
        helloMessage: '',
    },
};
The defined properties in the account schema will be available for every user account. They will be grouped under a key named after the Module name.
If a module with the module name hello is registered in a default application with the above example of an account schema, the user accounts would appear as shown below:
The properties token, sequence, keys, and dpos exist in the user account, as the blockchain application already has several modules registered by default.
|
{
  "address": "ae6fff8b9c9c3a8b38193d2186638f684d64d887",
  "token": {
    "balance": "20000000000"
  },
  "sequence": {
    "nonce": "0"
  },
  "keys": {
    "numberOfSignatures": 0,
    "mandatoryKeys": [],
    "optionalKeys": []
  },
  "dpos": {
    "delegate": {
      "username": "",
      "pomHeights": [],
      "consecutiveMissedBlocks": 0,
      "lastForgedHeight": 0,
      "isBanned": false,
      "totalVotesReceived": "0"
    },
    "sentVotes": [],
    "unlocking": []
  },
  "hello": {
    "helloMessage": ""
  }
}